Win11 Solved! KB5034123 cannot be installed

You may receive an error when installing Windows 11 update KB5034123, which was released on January 9, 2024.

There are currently four known errors:

  • 0x800f081f
  • 0 x 80248014
  • 0x800f0991
  • 0 x 80188309
table of contents

Reasons why KB5034123 cannot be installed and how to resolve it

Cause

  • 0x800f081f = CBS_E_SOURCE_MISSING
    Component store corruption. (Package or file source not found.)
  • 0x80248014 = WU_E_DS_UNKNOWNSERVICE
    The operation did not complete because the service is not in the data store.
  • 0x800f0991
    There is no specific explanation, but a similar error number is 0x800F0922.
  • 0x800F0922
    It may be impossible to connect to the Windows Update servers.
  • 0 x 80188309
    This may be due to a corrupted Windows Update cache file or a mismatch in services related to the Windows Update process.

Common causes for these issues are either the downloaded data being incorrect or an inability to connect to the Windows Update servers.

Other reasons include insufficient free space on the C drive or unnecessary data in the registry.

Solution

1. Free up space on the C drive

Please refer to the following page to check if there is enough free space on the C drive, delete unnecessary files, and then Windows Update Display the screen and try checking for updates (retrying).

How much free space is optimal for Windows 11 C drive?

2. Run the troubleshooter

Please refer to the following page to troubleshoot Windows Update and then try running Windows Update again.

Fix Windows 10/11 problems with the Troubleshooter

3. Repair system files

Please refer to the following page to repair the system files, then proceed to repair the Windows image.

Repairing system files in Win10/Win11 with "System File Checker"

4. Repair the Windows image

Open a command prompt as an administrator, type the following command, and press Enter:

Learn how to open a command prompt

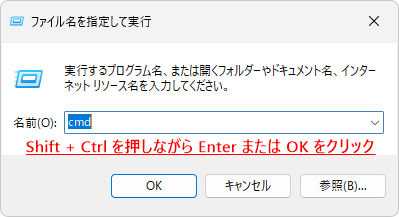
1. Press Windows key + R to open Run.

2. Type "cmd".

Run
Run

3.Shift + Ctrl + Enter Please press.

Keyboard
Keyboard

If you do not need administrator privileges, just press Enter.

4. When the "User Account Control" message appears, click "Yes".

ユーザーアカウント制御
ユーザーアカウント制御
Dism /online /cleanup-image /RestoreHealth

Once you execute the command, the process will begin, so please wait for a while.

command prompt
command prompt

Once the process is complete, restart your PC and then try running Windows Update.

5. Reset Windows Update components

If the above does not resolve the issue, try resetting the Windows Update components using the following batch file before updating.

I have created a batch file, so please copy the code, paste it into a text file, change the extension to ".bat" and save it. (If you do not specify the character code as "ANSI", the characters will be garbled and will not work properly.

What is a batch file?

Contents of the batch file to reset Windows Update components
@echo off

set /p a=Windows Update コンポーネントのリセットを開始するには y を 終了する場合は n を入力して Enter を押してください:
if /i "%a%"=="n" exit
if /i "%a%"=="y" goto :1
cls&%0

:1
net stop wuauserv
net stop bits
net stop cryptSvc
net stop msiserver

Ren %systemroot%\SoftwareDistribution SoftwareDistribution.old
Ren %systemroot%\System32\catroot2 catroot2.old

net start wuauserv
net start bits
net start cryptSvc
net start msiserver

echo ====================================================================================
echo.
echo Windows Update コンポーネントのリセットが完了しました。Enter を押して終了します。
pause
Download the batch file

If you are not comfortable creating batch files, you can download one here.

Target file: "Windows-Update-Component Reset.zip" (Ver 0.0.0.0)
ハッシュ値(SHA256):549b9ebc5728709874ef63d14c04f7a947344025889e99ec7b8dd9f5e346e63e

Reset Windows Update Components.zip

Once the download is complete, download "Reset Windows Update Components.zip"Unzipplease.

How to run a batch file

1. Right-click the batch file "Reset Windows Update Components.bat" and click "Run as administrator."

2. When the User Account Control screen appears, click "Yes".

3. To start the reset, type "y" and press Enter.

command prompt
command prompt

The command will start executing and will finish in a few seconds.

command prompt
command prompt

4. When you see the message "Windows Update components reset completed. Press Enter to exit," press Enter to close the command prompt.

Now that you have reset the Windows Update components, try running Windows Update again.

6. Disable VPN connection

If you connect to the internet via a VPN, this may prevent you from connecting to the Windows Update servers.

Temporarily disable your VPN connection, then display the Windows Update screen and try checking for updates (again).

7. Try changing the settings in the Local Group Policy Editor

Local Group Policy Editor is not available in Windows 11 Home

1. Press Windows key + R to open Run, type "gpedit.msc" and press Enter.

2. The Local Group Policy Editor will open, so open Local Computer Policy > Computer Configuration > Administrative Templates > All Settings.

Local Computer Policy\Computer Configuration\Administrative Templates\All Settings

3. Double-click "Specify settings for optional component installation and component repair" in the right column to open it.

Local Computer Policy\Computer Configuration\Administrative Templates\All Settings

4. This feature is "Disabled" by default, so select "Enable" and check "Download repair content and optional features directly from Windows Update instead of Windows Server Update Services (WSUS)" in the lower left corner, then click OK.

Specify settings for optional component installation and component repair

5. Once you have confirmed that "Specify settings for optional component installation and component repair" is enabled, close the Local Group Policy Editor.

Local Computer Policy\Computer Configuration\Administrative Templates\All Settings

Now that the settings are complete, go to the Windows Update screen and try checking for updates (retrying).

*The "Specify settings for optional component installation and component repair" setting configured in the Local Group Policy Editor will revert to "Disabled" once the update is complete and you restart your PC.

8. Delete Registry Values

If you operate the registry incorrectly, it may cause problems such as the system being unable to start. Please make a backup in advance using system restore or similar, and proceed at your own risk.

To avoid panicking if your PC suddenly breaks down, it's a good idea to have a standard backup software to protect your important photos and data.

1. Press Windows key + R to open Run, type "regedit" and press Enter.

2. The Registry Editor will open, so open the following key:

HKEY_LOCAL_MACHINE\SOFTWARE\Policies\Microsoft\Windows\WindowsUpdate

3. With the "WindowsUpdate" key selected, delete "WUStatusServer" and "WUServer" in the right column.

"WUStatusServer" and "WUServer"
レジストリエディター
レジストリエディター

4. Close the Registry Editor, display the Windows Update screen, and try checking for updates again.

If you found this article helpful, please share it on social media.

Person who wrote this article

Driven by questions arising from my daily PC use and the desire to "do more," I have been pursuing self-study in Windows since around 2008. I am sharing the "aha!" techniques and solutions I discovered through trial and error with the sole purpose of helping you in your PC life.

View profile

Comment:

To comment

[About submissions]
We welcome any questions or information regarding the content of the article.
However, please note that content unrelated to the purpose of the article, criticism of specific individuals or organizations, offensive language,Inappropriate wordsComments containing the above may be deleted or made private without notice at the discretion of the administrator.
Please note that spam may be automatically deleted by anti-spam measures.

CAPTCHA


table of contents