今回は、Windows 11 の「設定」内にある「Wi-Fi」の項目が消えてしまった場合の対処法を紹介します。
特に、 Windows Update で更新プログラムをインストールした直後や、 Windows 11 の大型アップデートを適用した環境で多く発生しているようです。

「設定」の Wi-Fi の項目が消えてしまう原因と対処法
原因
「設定」に「Wi-Fi」の項目が表示されなくなる原因は、
- Wi-Fi のネットワークアダプターが無効化されている
- Wi-Fi のネットワークドライバーがインストールされていない
- Wi-Fi のネットワークアダプター自体が壊れている
- Bluetooth 無線LAN 子機を使用している場合は、Bluetooth のドライバーなどに問題がある
のいずれかが考えられます。
上記の場合、「Wi-Fi」は機能せず、「Wi-Fi(無線)」でインターネットに接続することができません。
タスクトレイ(通知領域)の「Wi-Fi」のアイコンも地球儀のアイコンに変わってしまいます。

このアイコンをクリックして「クイック設定」を開いても「Wi-Fi」の表示はありません。

対処法
1.Wi-Fi のネットワークドライバーがインストールされていない場合
「ネットワークの詳細設定」に Wi-Fi の項目がない場合、Wi-Fi のネットワークドライバーがインストールされていないことが考えられます。別の PC やスマートフォンを使って、メーカーの公式サイトから該当機種の「無線LAN ドライバー(Wi-Fi ドライバー)」をダウンロードし、USBメモリなどを経由してインストールしてください。 ※購入時にドライバーCDが付属していた場合は、そちらからインストールすることも可能です。
【どうしてもドライバーが見つからない場合】
コメントまたはお問い合わせフォームから、以下の情報を添えてご連絡いただければ、ドライバーの配布ページをお調べします。
- PC のメーカー名と型番(例:NEC LAVIE N15xx/xx)
- OS のバージョン(Windows 10 または Windows 11)
- 現在の状況(デバイスマネージャーに「!」マークがある、など)
※古い PC の場合、メーカーがドライバーの提供を終了している場合がありますので、予めご了承ください。
Windows 11 の大型アップデートや最新の更新プログラムを適用した直後にこの問題が発生した場合、 OS のセキュリティ強化(脆弱性対策)により、古いドライバーがブロックされている可能性があります。この場合も、メーカーサイトから最新のドライバーを入手して更新することで解決するケースがほとんどです。
2.Wi-Fi のネットワークアダプター自体が無効化されている場合
1.Windowsキー + R を押して「ファイル名を指定して実行」を開き、次のいずれかのコマンドを入力して Enter を押します。
ncpa.cplまたは
explorer ::{7007ACC7-3202-11D1-AAD2-00805FC1270E}2.「ネットワーク接続」が表示されますので、「Wi-Fi」のアイコンを確認してみてください。

「Wi-Fi」のアイコンがグレー(「無効」と表示されている)になっている場合、「ネットワークの詳細設定」に「Wi-Fi」の項目は表示されなくなります。
この場合、「Wi-Fi」のアイコンをダブルクリックするか、右クリック>「有効にする」をクリックすると有効化されます。
ここに「Wi-Fi」のアイコン自体が存在しない場合、Wi-Fiのアダプター(受信機)が認識されていません。以下の原因が考えられます。
- Wi-Fi のドライバーが入っていない(デバイスマネージャーを確認してください)
- 物理的に故障している、または接触不良を起こしている
3.BIOS の設定確認、またはハードウェア(アダプター)の故障
稀なケースですが、PC の土台となるシステム(BIOS/UEFI)の設定で、Wi-Fi 機能自体が無効(Disabled)になっている可能性があります。
対処法: PC 起動時にメーカー指定のキー(F2 や Delete キーなど)を押して BIOS 画面に入り、「Wireless LAN」や「WLAN」といった項目が「Disabled(無効)」になっていないか確認してください。 項目が見つからない、よくわからない場合は、BIOS のメニューにある「設定を初期化(Load Default Settings など)」を実行することで改善する場合があります。
【どうしても直らない場合】 上記すべてを試しても「Wi-Fi のアイコンが出ない」「ドライバーも入らない」という場合は、PC 内部の Wi-Fi 部品が物理的に故障している可能性が高いです。
- 修理: メーカーや修理店に依頼する(高額になる場合があります)。
- 代替案: 家電量販店などで売っている「USB 無線LAN子機(Wi-Fi アダプター)」を購入して取り付ける。
- ※数千円で購入でき、USB ポートに挿すだけで Wi-Fi が使えるようになるため、手軽な解決策としておすすめです。
4.Bluetooth 無線LAN 子機を使用している場合
Wi-Fi と Bluetooth の機能が一体になった USB 無線LAN 子機を使用している場合、ドライバーの競合や Bluetooth 側の不具合が原因で、Wi-Fi の項目まで消えてしまうことがあります。 まずは、USB ポートから一度子機を抜き、別のポート(できれば PC 背面のポート)に挿し直して正しく認識されるかを確認してみてください。
※ 最近 Windows 11 で Windows Update を適用した後、「Bluetooth が突然使えなくなる」「設定画面から Bluetooth の項目自体が消えてしまう」という不具合が確認されています。もし Wi-Fi と同時に Bluetooth の項目も消えている場合は、以下の記事の対処法もあわせてお試しください。
「Wi-Fi」の項目は表示されたけどインターネットに繋がらない場合
1.「ネットワークの詳細設定」
1.タスクトレイの「Wi-Fi」のアイコン(地球儀のアイコンになっている場合あり)の上で右クリック>「ネットワーク設定とインターネット設定」をクリックします。

2.「設定」>「ネットワークとインターネット」が開きますので、一番下にある「ネットワークの詳細設定」をクリックします。

3.「ネットワークの詳細設定」が開きますので、「ネットワークアダプター」の下の「Wi-Fi」の項目の右側を確認してください。「Enable」と表示されていませんか?

「Enable」と表示されている場合、「Enable」をクリックしてみてください。
「無効にする」に変わると、「Wi-Fi」のネットワークアダプターが有効化され、インターネットに接続することができるようになります。
2.SSID が表示されない場合
「Wi-Fi」のネットワークアダプターが有効化されても SSID が表示されない場合は、以下を確認してみてください。
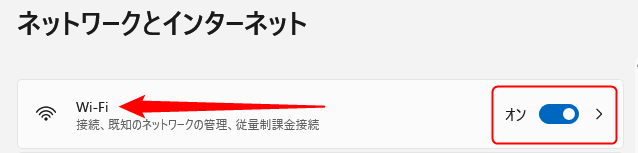
1.「設定」>「ネットワークとインターネット」で「Wi-Fi」は「オン」になっていますか?
2.「オン」になっている場合、「Wi-Fi」の文字の部分をクリックします。
3.「利用できるネットワーク」をクリックすると、
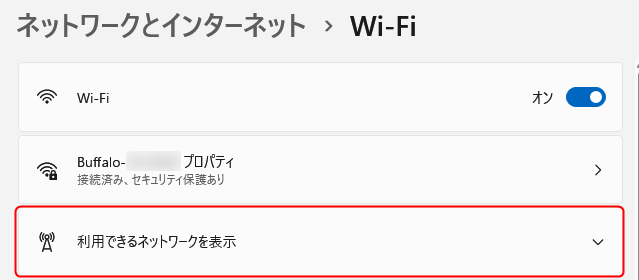
通常は複数の SSID(ご使用の Wi-Fi 等) が表示されます。(ここに何も表示されないという前提で進めます)
4.「利用できるネットワーク」に何も表示されない場合は、その下にある「既知のネットワークの管理」をクリックしてみてください。

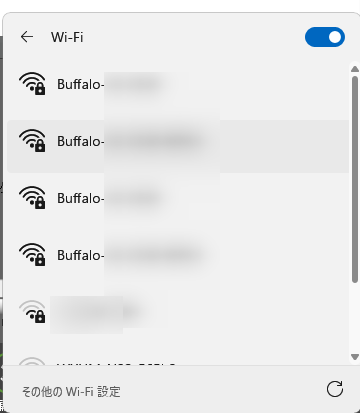
5.ここには以前接続したことのある SSID が表示されています。SSID が表示されている場合は、接続したい SSID の名前をクリックしてください。
6.ここに「範囲内の場合は自動的に接続する」というチェックボックスがありますので、チェックしてみてください。
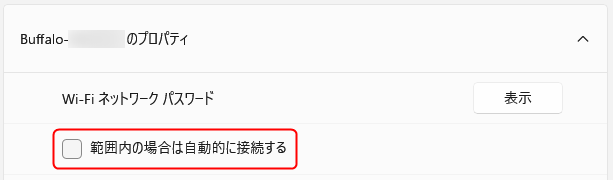
他に問題がなければ自動的にネットワークに接続できると思います。
3.接続できない場合
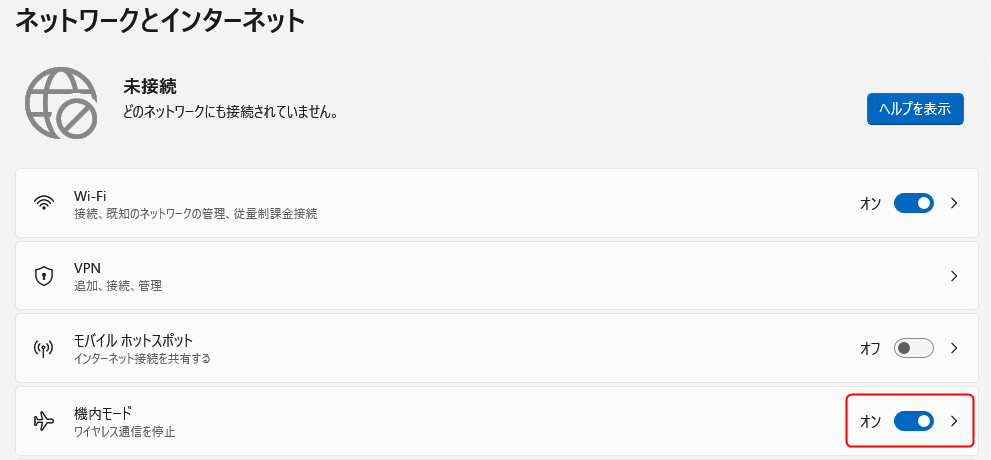
上記の 2つの方法で接続できない場合は、「設定」>「ネットワークとインターネット」に戻り、「機内モード」が「オン」になっていないかを確認してください。
4.ネットワークのリセット
「機内モード」を「オフ」にしても接続できない場合は、ネットワークのリセットを実行してから PC を一度再起動してみてください。
※シャットダウンしてからの起動ではなく、必ずスタートボタンを右クリック>「シャットダウンまたはサインアウト」>「再起動」をクリックして再起動してください。
5.ルーターの再起動
ネットワークのリセットを行っても接続できない場合は、Wi-Fi ルーターを再起動してみてください。
手順:
- Wi-Fi ルーターの電源を切る
- モデム(ONU)の電源を切る
- 5分~10分ほど放置
- モデム(ONU)の電源を入れる
- Wi-Fi ルーターの電源を入れる
接続できない場合は、PC を一度再起動してみてください。
6.更新プログラムのアンインストール
もし Windows Update で更新を行った後にネットワークの不具合が発生した場合は、該当の更新プログラムをアンインストールすることで接続できるようになる可能性があります。
【解決】Windows更新プログラムがアンインストールできない?原因と対処法を徹底解説
更新プログラムのアンインストール画面には、インストールされた日付が表示されていますので、不具合が発生したタイミングでインストールされた更新プログラムをアンインストールしてみましょう。

Win10/Win11 Windows Update を一時停止する方法
7.システムの復元
もし上記のすべてを行っても解決できない場合は、システムの復元で問題がなかった日まで復元をしてみてください。
更新プログラムのインストールが原因だと思ったら、実は別の問題だったりします。それは、ユーザーの誤操作やサードパーティ製のソフトウェアがシステムに変更を加えてしまった場合などです。このような場合に、システムの復元が非常に役に立ちます。
2025/10/08 追記:BIOS が原因で Wi-Fi が使えなくなることもある
BIOS は PC のハードウェア全てを管理する土台となるプログラムです。
Windows が大型アップデートで OS の根幹部分に変更を加えた際、古い BIOS がその変更に追従できず、ハードウェア(キーボード、Wi-Fi/Bluetooth チップなど)との通信に齟齬をきたすことがあります。
※「齟齬をきたす」とは、食い違いが生じ、物事がうまく進まなくなることです。
BIOS を最新版にアップデートすることで、OS との互換性が向上し、これまで解決できなかった問題が嘘のように解消されるケースが実際に報告されています。
これは、PC メーカーが OS の変更に対応するための修正を BIOS アップデートに含めているためです。
【重要】BIOSアップデートの前に必ず確認すべきこと
BIOS アップデートは非常に強力な解決策ですが、手順を誤ると PC が起動しなくなる(文鎮化する)リスクを伴います。 作業は自己責任で、細心の注意を払って行ってください。
| 準備・確認事項 | 説明 |
| データのバックアップ | 万が一に備え、重要なデータは必ず外付け HDD やクラウドにバックアップしてください。 |
| マザーボードの型番確認 | 間違った BIOS ファイルを使用すると PC が壊れます。型番は絶対に間違えないでください。Windowsキー + R を押して「ファイル名を指定して実行」を開き、「msinfo32」と入力して Enter を押すと、「システム情報」で「ベースボードの製造元」と「ベースボード製品」が確認できます。 |
| 電源の安定確保 | アップデート作業中の停電は致命的です。ノートPC の場合は ACアダプターとバッテリーの両方を接続し、デスクトップPC の場合は天候が安定している日に行うなど、電源が落ちない環境を確保してください。 |
| メーカー公式サイトの利用 | BIOS ファイルは必ずお使いの PC またはマザーボードのメーカー公式サイトからダウンロードしてください。非公式サイトからダウンロードしたファイルには、ウイルスやスパイウェアなどの悪意のあるプログラムが仕込まれている可能性があります。また、古いバージョンであったり、ファイルが破損していたり、自分の PC モデルとは微妙に違うバージョンのファイルだったりする危険性があります。 |
BIOS を最新版にアップデートしたことが原因で Wi-Fi 等のドライバーが使えなくなる(ブロックされる)こともあります。
現在、多くの PC で使われているセキュアブート証明書(2011年版)が、2026年から順次有効期限切れを迎えます。そのため、現在メーカーがリリースしている BIOS には、既に新しいセキュアブート証明書(2023年版)が含まれている可能性があります。
BIOS アップデートの一般的な手順
メーカーやモデルによって手順は異なりますが、一般的な流れは以下の通りです。
- BIOSファイルのダウンロード:
- USBメモリの準備:
- FAT32 形式でフォーマットされた USBメモリを用意します。
- 解凍した BIOS ファイル(「.CAP」 「.ROM」などの拡張子)を USBメモリのルートディレクトリ(フォルダに入れない直下の階層)にコピーします。
- BIOS画面(UEFI)の起動:
- PC を再起動し、起動直後にメーカーロゴが表示されている間に「Delete」キーや「F2」キー(下記を参考にしてください)を連打してBIOS 画面に入ります。
- アップデートツールの実行:
- BIOS 画面の中から「EZ Flash」「Q-Flash」「M-Flash」といった名称のアップデートツールを探して起動します。
- ツールが USBメモリを認識したら、コピーした BIOS ファイルを選択します。
- アップデートの実行と待機:
- ファイルが正しいか最終確認のメッセージが表示されるので、確認して実行します。
- アップデート中は絶対にPCの電源を切ったり、USBメモリを抜いたりしないでください。
- 完了すると自動的に PC が再起動します。何度か再起動を繰り返すこともありますが、正常な動作です。
例えば筆者の環境の場合、BIOS の更新後、下記の手順を行います。
- BIOS 画面を開き、セキュアブートや CSM などの設定をメモ
- 筆者の環境では、Windows 11 を起動するためには「セキュアブート」は有効、「CSM」は無効である必要があります。
- 下記の画面で「UEFI BIOSを既定値に戻す」
- 「設定内容を保存して再起動」
- 再度 BIOS 画面を開き、セキュアブートや CSM の設定を確認
- メモしていた設定と異なれば設定を戻す
- 「設定内容を保存して再起動」をする
- Windows 11 を起動

ASRock B550M Pro4 マザーボード BIOS の更新方法と注意点
主要マザーボードメーカーサポートページ:
一般的なメーカーのショートカットキーは次のいずれかのキーを使用します。
- Delete, ESC, F1, F2, F8, F9, F10, F12
パソコンの電源を ON にしたら、すぐにキーボードのショートカットキーを数回押してください。
一部のメーカーのショートカットキーを紹介しますので参考にしてみてください。
| ショートカットキー | メーカー |
|---|---|
| F2 | Sony(ソニー),Dell(デル),Acer(エイサー),FUJITSU(富士通),Samsung(サムスン),ASUS(エイスース) |
| F2 または F10 | HP |
| F1 | ThinkPad |
| ESC を押してから F1 を押す、または F2キー | TOSHIBA(東芝) |
| F2 または Fn + F2 | Lenovo(レノボ) |
コメント