今回は、「DeepL翻訳」をアンインストールしたにもかかわらず右クリックメニューの「DeepLで翻訳」が消えない場合の対処法を紹介します。

「DeepL翻訳」は、インストールをするとレジストリに右クリックメニューの情報を書き込みます。
さらに、必要なファイルが Cドライブのフォルダーにコピーされます。
このレジストリの情報とファイルの場所は、インストールの際に通常の「インストール」または「すべてのユーザー」ボタンからのインストールで変わってきます。

一般的にソフトウェアをアンインストールする際にはレジストリ値やファイルも削除されるのですが、「DeepL翻訳」のように一部の情報を削除しないソフトウェアが存在します。
右クリックメニューの「DeepLで翻訳」が消えない場合の対処法
レジストリの操作を間違えると、システムが起動できなくなるなどの不具合が起きる可能性があります。事前にシステムの復元などでバックアップを取り、自己責任で行うようお願いします。
- システムの復元ポイント作成方法及び復元方法
- レジストリエディターの開き方及びバックアップ方法
- Windows 11/10 レジストリの予備知識|概念・開き方・内部構成
- Windows 11レジストリの所有権を取得し、アクセス許可を変更する方法

レジストリを編集しますので、苦手な方は後で紹介する簡単なツールをご利用ください。
レジストリの編集
1.Windowsキー + R を押して「ファイル名を指定して実行」を開き、「regedit」と入力して Enter を押します。
2.レジストリエディターが開きますので、次のキーを開きます。
通常のインストールをした場合:
HKEY_CURRENT_USER\Software\Classes\*\shell「すべてのユーザー」ボタンからインストールした場合:
HKEY_CLASSES_ROOT\*\shell3.「shell」キーの左側にある「>」をクリックするとサブキーが表示されますので、「ZeroInstall.DeepL」キーの上で右クリック>「削除」をクリックします。

4.キーの削除の確認画面が表示されますので「はい」をクリックします。

これで右クリックメニューの「DeepLで翻訳」は消えます。
右クリックメニューの「DeepLで翻訳」を削除するツール
このツールは、上記のレジストリ操作と同じことをボタン 1つで行うツールです。
難しい操作、操作を間違えずに簡単に右クリックメニューの「DeepLで翻訳」を削除することができます。
当サイトで配布しているソフトウェアは、すべて ESET インターネット セキュリティ にてウイルスチェックを実施しておりますが、個人開発のため Microsoft の正規デジタル署名がありません。そのため、初回実行時に一部の環境で以下の警告が表示される場合があります。
- Windows の警告: 「Windows によって PC が保護されました」と表示された場合は、「詳細情報」をクリックしてから「実行」を選択してください。
- セキュリティソフトの警告: ESET などの定義ファイル更新後に「Suspicious Object (不審物)」として誤検知される場合がありますが、危険なプログラムではありません。
ファイルのハッシュ値( SHA256 )による正当性の確認方法や、免責事項・ご利用条件については、ご利用前に必ず以下のページをご確認ください。
対象ファイル:「右クリックメニューの「DeepLで翻訳」を削除する.exe」(Ver 1.0.0.0)
ハッシュ値(SHA256):24d79690f08bcc971fc0f58e650a43c7f87f2f4bd45e309ff0508975066688e2
右クリックメニューの「DeepLで翻訳」を削除するツールの使用方法
1.ダウンロードした「右クリックメニューの「DeepLで翻訳」を削除する.zip」を解凍し、中にある「右クリックメニューの「DeepLで翻訳」を削除する.exe」を実行します。
2.ユーザーアカウント制御の画面が表示されたら「はい」をクリックします。
3.「右クリックメニューの「DeepLで翻訳」を削除する」ボタンをクリックします。


4.「右クリックメニューの「DeepLで翻訳」を削除しました」と表示されたら OK をクリックしてツールを閉じてください。
この時点で右クリックメニューの「DeepLで翻訳」は消えています。
「DeepL翻訳」のアンインストールで残ったファイルを削除する
アンインストールで残ったファイルは次のフォルダーにあります。
通常のインストールをした場合:
C:\Users\ユーザー名\AppData\Local「すべてのユーザー」ボタンからインストールした場合:
C:\ProgramDataそれぞれのフォルダー内に「0install.net」というフォルダーがあります。
この「0install.net」フォルダーが「DeepL翻訳」のアンインストールで残ったフォルダーです。
中にはいくつかのフォルダーとファイルが入っていますが、すべて不要ですので、「0install.net」フォルダーごと削除して構いません。
また、ファイルサイズは 350KB 程度で非常に小さいので、削除しなくても問題はありません。
フォルダーが削除できない場合
※必ず「DeepL翻訳」をアンインストールしてから行ってください。アンインストールせずに実行しても削除時にファイルが使用中と表示されて削除できません。
コマンドプロンプトを管理者として開き、次のコマンドを入力して Enter を押します。
コマンドプロンプトの開き方を見る
1.Windowsキー + R を押して「ファイル名を指定して実行」を開きます。
2.「cmd」と入力します。
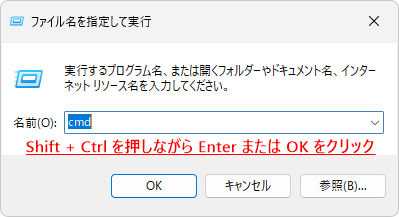
3.Shiftキー + Ctrlキーを押しながら Enter を押してください。

4.「ユーザーアカウント制御」が表示されたら「はい」をクリックします。

通常のインストールをした場合:
icacls %userprofile%\AppData\Local\0install.net\implementations /t /q /c /reset「すべてのユーザー」ボタンからインストールした場合:
icacls C:\ProgramData\0install.net\implementations /t /q /c /reset次の画像のように、「* 個のファイルが正常に処理されました。0 個のファイルを処理できませんでした」と表示されたらコマンドプロンプトを閉じてください。

「0install.net」フォルダーは削除できるようになっていますので、もう一度削除してみましょう。
※もしもコマンドを実行した後でも削除できない場合は、一度 PC を再起動してから削除してみてください。
削除できなかった原因は、「0install.net」フォルダー内にある「implementations」フォルダーが実装キャッシュであり、この中のファイルがアクセス許可を使用して読み取り専用に変更されていたためです。
コメント