[Complete Guide] What is DISM Command? Complete Steps to Fix Windows 11 Won't Boot

"It was working fine until yesterday, but suddenly Windows 11 won't start..." Have you ever been at a loss when you see a blue or black screen? In most cases, the cause is corrupted system files.

In this article, we will explain in more detail than anywhere else about the DISM (Deployment Image Servicing and Management) command, a powerful weapon that can help you overcome such hopeless situations, from the basics to advanced techniques used by professionals.

By the end of this article, you'll have a full understanding of why repairs fail, how to improve your chances of success, and the knowledge to restore Windows 11 on your own.

table of contents

What is DISM Command? Windows Self-Repair Tool Basics

DISM is a command-line tool that comes standard with Windows. Its main role is to scan the Windows system image itself and repair corrupted files and inconsistencies.

What's the difference between SFC and DISM? Which should I use first?

A famous Windows repair command is "SFC (System File Checker)These two have different roles and work best when used in conjunction with each other.

Tool nameroleFor example
SFCCompares key system files to protected versions and replaces any that are corruptedParamedics providing first aid
DISMRepair the SFC-referenced repair source (component store) itselfHospitals that stock and maintain medical supplies used by emergency personnel

If the component store ("C:\Windows\WinSxS" folder) is corrupted, running SFC will fail to repair the problem because there are no healthy files to replace.

As a general rule, first fix the foundation of the repair with DISM, then check the individual files with SFC.That is the most reliable procedure.

DISM's two modes: "Online Repair" and "Offline Repair"

DISM has two main modes that you can use depending on the situation:

  • Online Repair (/Online): Repairs the currently running Windows itself. Use this when your PC starts normally but is unstable.DISM /Online /Cleanup-Image /RestoreHealth
  • Offline Repair (/Image): This is the main focus of this article. Repairs Windows that is not currently working, such as a Windows that will no longer start or a drive that has been removed from one PC and connected to another.DISM /Image:E:\ /Cleanup-Image /RestoreHealth

When Windows won't start, it's inevitable thatOffline Repairwill be required in addition to your identification documents.

DISM /Online What does it mean to connect to the Internet? Here's what it really means:

DISM command/OnlineYou might be looking at the option and thinking it means "Connect to the Internet and Repair," but that's actually a common misconception.

"Online" in the context of this command is a technical term that refers to a currently up and running (live) Windows OS, rather than a network connection.

  • Online (/Online): I'm using it right now, refers to a running version of Windows.
  • Offline (/Offline): Not started,Stopped It refers to Windows.

If we use the analogy of a car engine...

  • /OnlineRepairs with this method are like inspecting and repairing the car with the engine running (idling).
  • /OfflineRepairs inRemove the engine from the carThe image is of disassembling and repairing it on a workbench.

So why is it so easy to confuse it with the Internet?

That is, /OnlineIf you run the repair in mode, the good files that DISM uses for repair areAttempts to download from Windows Update by defaultThis means that an internet connection is ultimately used, which can lead to misunderstandings.

Knowing the correct meaning of these terms will help you more easily diagnose and troubleshoot errors.

Complete steps to repair Windows 11 offline if it won't boot

From here, we will explain the specific steps to actually repair a PC that will no longer boot into Windows 11.

STEP 1: What to prepare

  • Windows 11 installation media (USB memory): A USB memory stick with at least 8GB of free space is required.
  • Another PC that works fine: Used to create the installation media above.

First, please refer to the following page to create Windows 11 installation media.

How to Use the Windows 11 Media Creation Tool | Error Troubleshooting

STEP 2: Boot into the recovery environment and check the drive letter

1. Insert the Windows 11 installation media (USB memory) you created intoPC that won't start Connect to.

2. Turn on your PC and immediately press a specific key (F2, F12, Deleteor other settings, depending on the manufacturer) to open the BIOS/UEFI menu and change the boot device priority to the USB memory stick.

3. Save the settings and restart the computer. The computer will boot from the USB drive. When the message "Press any key to boot from CD or DVD..." appears, press Enter.

Press any key to boot from CD or DVD....
Press any key to boot from CD or DVD….

If the "Windows 11 Setup" screen appears, the installation was successful.

4.Shift + F10 Press the keys simultaneously to open a command prompt.

5.[Most important] Check the drive letter to be repaired. In the recovery environment, what is normally the C drive will often be changed to the D or E drive.

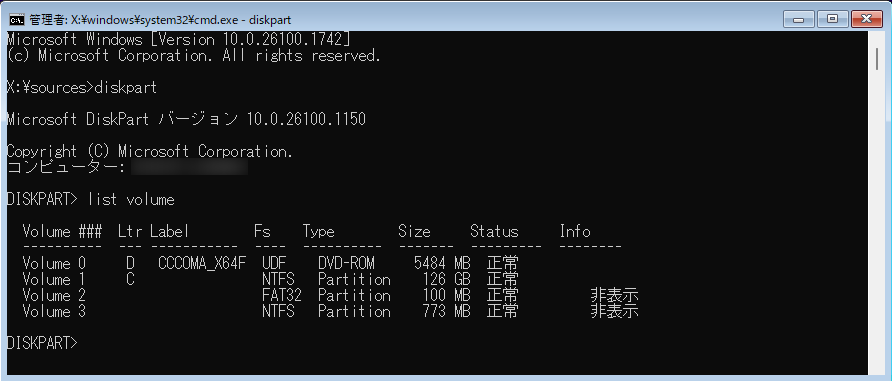
  1. diskpartand press Enter.
  2. list volumeand press Enter.
# diskpartを起動 
diskpart

# ボリューム一覧を表示 
list volume 

6. From the list displayed, select the letter (LtrIf there are several candidates, remember them all.

command prompt
command prompt

7.exitand press Enter.

# diskpartを終了
exit

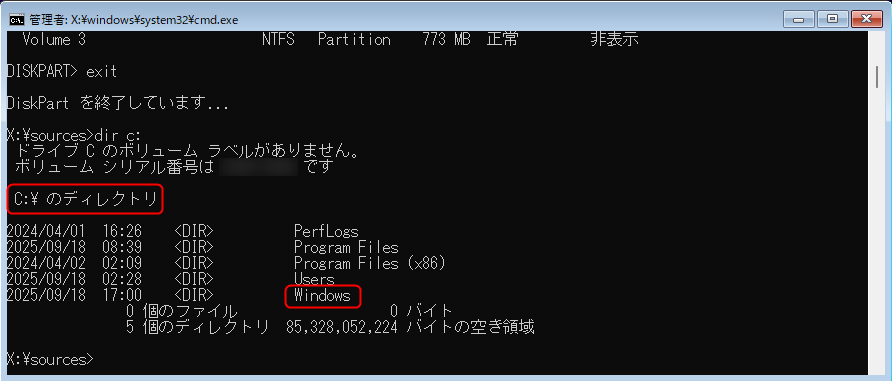
8. Next, check the contents of the selected drive.dirUse the command to find the drive where the "Windows" folder is located. For example, if the candidates are drives C, D, and E, try them in order as follows:

dir C:

If you get a message like "File not found," try the next drive.

dir D:

If the contents are different, such as a recovery partition, try the following:

dir E:

If the command displays a folder like the one below, that is the drive you are looking for.

  • PerfLogs
  • Program Files
  • Program Files (x86)
  • Users
  • Windows

In this example,EdriveIt has been confirmed that this is the Windows drive to be repaired. (The image below showsCdriveis the Windows drive to be repaired)

command prompt
command prompt

STEP 3: Run the DISM command (basic)

Once you have confirmed the drive letter, it's time to run the DISM command.

DISM /Image:E:\ /Cleanup-Image /RestoreHealth

E:\Please replace the part with the drive letter of your environment that you confirmed earlier.

This command:E:It will scan the health of the Windows image on your drive and attempt to automatically repair any issues that can be fixed. This process may take some time, so be patient and wait until it reaches 100%.

Unraveling the mystery of DISM's "Repair Source"! Why does an error occur?

Have you ever encountered the error "Source files not found" when running DISM? This means that DISM was unable to find a known good file to use as a "model" for repair. Understanding how this "repair source" works is the key to troubleshooting.

Where do repair files come from? How DISM works

DISM first searches the drive being repaired itself for repair files.

  1. Attempts at self-repair: DISM will only repair the drive (e.g. E:)Component Store(E:\Windows\WinSxS) This folder contains backups of system files, and DISM will try to find healthy files from there to replace corrupted files.
  2. The limits of self-repairHowever, if the component store itself is damaged due to repeated updates or serious corruption, DISM will not be able to find the files necessary to repair it and will display an error.

The real cause of the "Source Not Found" error

The most common causes of this error are:The version of the Windows installation media you are trying to use for repair is older than the version of Windows you are trying to repair.It is that.

  • Windows to be repairedRegular Windows Updates keep your system files up to date.
  • Your installation media: If it was created six months ago, the system files in it will remain six months out of date.

Even though the PC you are trying to repair has the latest updates applied, the old installation media does not contain the new files included in the updates, so DISM cannot find the "model" and the repair fails.

To use a Lego block analogy...

  • PC to be repaired: A Lego castle that you built and then modified with new parts.
  • Old installation media: The basic Lego Castle kit before modification.
  • Result: If the new parts used in the modification break, they cannot be repaired because they are not included in the basic kit.

[Advanced] / How to dramatically increase the repair success rate with Source option

The most reliable way to avoid errors and get DISM repair success rate close to 100% is to/Source option to explicitly specify the repair source.

STEP 1: Prepare the latest installation media

As mentioned above, please refer to the following page:Always create the latest version of Windows 11 installation mediaDo it. It's the fastest way to success.

How to Use the Windows 11 Media Creation Tool | Error Troubleshooting

STEP 2: Full syntax for DISM command with /Source

Connect the latest installation media to your PC and check the drive letter of the installation media in the command prompt of the recovery environment (as an example,F:(Assuming this is the case.)

Then run the following command:

DISM /Image:E:\ /Cleanup-Image /RestoreHealth /Source:ESD:F:\sources\install.esd:1

The image file (ISO file) downloaded using the media creation tool "MediaCreationTool" uses .esd files.

command prompt
  • /Image:E:: The drive containing the Windows you want to repair.
  • /Source:ESD:F:\sources\install.esd:1: The file source location that serves as the example for repair.
    • F:\: The drive letter of the installation media.
    • sources\install.esd: A Windows image file stored on installation media.
    • :1: install.esdIf the installation contains multiple Windows editions (Pro, Home, etc.), specify the index number. Usually, "1" is fine.

Index Number:

  1. Windows 11 Home
  2. Windows 11 Education
  3. Windows 11 Pro

Note: For install.wim files:

The image file (ISO file) downloaded from the official Microsoft page listed below uses a compressed file called .wim rather than .esd. If you created the installation media using a tool other than the media creation tool "MediaCreationTool," please check and if it is .wim, change the command as follows:

DISM /Image:E:\ /Cleanup-Image /RestoreHealth /Source:WIM:F:\sources\install.wim:1

How to download Windows 11 ISO files

Supplement: Regarding the display of "¥" and "\":

On websites and articles, the path separator is a backslash "\", when pasted into a Japanese command prompt or entered on the keyboard, the yen symbol "¥" may be displayed.

This is due to the specifications of Japanese fonts and character codes.Even though they look different, they are correctly recognized as the same characters within the system.

On the command prompt,¥Even if this message is displayed, there is no problem, so feel free to execute the command.

What to do after running DISM

Once DISM has repaired the component store, it's time for some finishing touches.

Final check with System File Checker (SFC)

Now that the foundation for repair is in place, we'll run the SFC command to perform a final check on individual system files for any issues, again in offline mode.

Repairing system files in Win10/Win11 with "System File Checker"

sfc /scannow /offbootdir=E:\ /offwindir=E:\Windows
  • /offbootdir=E:\: Specifies the boot drive.
  • /offwindir=E:\Windows: Specify the location of the Windows folder.

If you see the message "Verification 100% complete," the system files have been successfully repaired.

Restart your PC and check if it works

Open Command Prompt exit Close the "Windows 11 Setup" screen with the "X" button and restart your PC. At this time, don't forget to open the BIOS/UEFI menu and change the boot order back to the original internal storage (SSD/HDD). (See "STEP 2: Boot into the recovery environment and check the drive letter" Step 2)

If the Windows 11 logo appears and the desktop screen (sign-in screen) appears, the repair is successful.

Why can DISM commands fix Windows not booting issues?

One of the main reasons why Windows won't start is that the "system file" may be damaged.

The DISM command will run to repair this corrupted system file.Official Self-Healing ToolThat's why.

Specifically, the problem is solved by the following mechanism:

  1. Check out the Windows Parts Warehouse: DISM thoroughly scans the huge repository called the "Component Store" where all Windows components (system files) are stored.
  2. Replace any damaged parts: If any broken or missing parts (corrupted files) are found during the scan, they will be replaced with working spare parts (copies of working files) stored in the warehouse.

In other words, Directly repair the OS blueprint and frameworkThis will bring your system back to a healthy state so that it can start up again.

However, if the problem is caused by a physical failure of the hard disk or something other than a system file (such as the boot record), DISM alone may not be able to resolve the issue.

Why does DISM command get stuck at 62.3%?

When you perform a Windows image repair, 62.3% This may cause the game to stop at an odd number, leading you to wonder if it has frozen, but this is not a malfunction.

Internally, complex data organization (WinSxS folderThis may take some time depending on your environment. If it stops, don't panic. At least an hour Please wait a moment.

How to check if it's really working

Task managerOpen it and look at the Processes tab. "Windows Modules Installer Worker" If this process is running, repair work is being carried out in the background.

Also, if you notice high disk usage in processes such as "System" or "Windows Update," this is proof that the repair is working hard. Do not close PowerShell in the middle of the process, but wait patiently until it is completed.

Summary

This time, we have thoroughly explained the powerful tool "DISM" for repairing Windows 11 that will no longer boot. Finally, let's review the important points.

  • DISM is a more powerful repair tool that fixes the foundations of SFC.
  • If the PC does not boot, boot it from the installation media and perform an "Offline Repair (/Image)"
  • The main cause of the "source not found" error is that the repair source version is outdated.
  • The key to success is to have the latest installation media ready./SourceMust be explicitly specified as an option.
  • After repairing with DISM, the most reliable procedure is to perform a final check with SFC.

Having trouble booting up Windows can be very frustrating, but by staying calm and following the steps in this article, you can often get your system up and running again without losing any data.

First, just in case, run the software on a PC that is working properly.Create the latest Windows 11 installation media.I recommend this. It will be the best way to save your future.

If you found this article helpful, please share it on social media.

Person who wrote this article

Driven by questions arising from my daily PC use and the desire to "do more," I have been pursuing self-study in Windows since around 2008. I am sharing the "aha!" techniques and solutions I discovered through trial and error with the sole purpose of helping you in your PC life.

View profile

Comment:

To comment

[About submissions]
We welcome any questions or information regarding the content of the article.
However, please note that content unrelated to the purpose of the article, criticism of specific individuals or organizations, offensive language,Inappropriate wordsComments containing the above may be deleted or made private without notice at the discretion of the administrator.
Please note that spam may be automatically deleted by anti-spam measures.

CAPTCHA


table of contents