Win11 Home: What to do when Hyper-V won't start or disappears [0x800705B4]

For those of you using Hyper-V on Windows 11 Home edition, have you suddenly encountered the following problems after applying a Windows Update (cumulative update)?

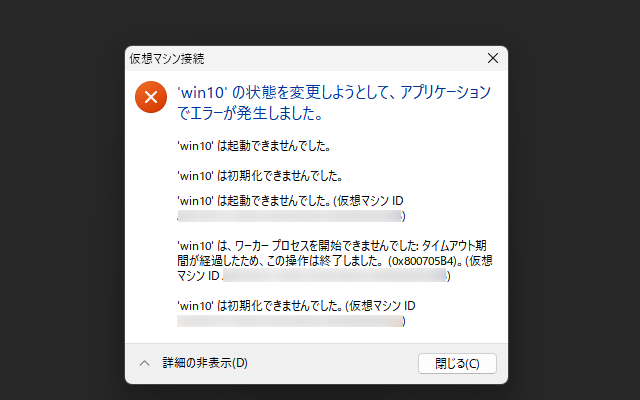
  • Virtual machine fails to start with error 0x800705B4
  • The Hyper-V item has disappeared from the "Turn on Windows features" list.

In fact, this issue is not a temporary problem limited to specific updates (such as KB5066835 or KB5074109). Due to the structure of Windows 11 Home,A chronic issue that is likely to recur with every Windows Update.

However, please rest assured. We have already identified the cause through our investigation and have established a "permanent solution" that will work even if the issue recurs with any future updates.

This article will explain in detail the causes of loss and errors, as well as the steps to reliably repair them.

table of contents

Summary of the issue

This issue occurs when the following specific conditions are met:

This issue mainly occurs in an environment where the following conditions overlap:

  • OS: Windows 11 Home edition (version 24H2/25H2, etc.)
  • environment: Hyper-V is enabled unofficially using a batch file or similar.
  • timing: After applying Windows Update (monthly cumulative update)
    • *This issue occurs periodically with updates that involve updating system files, and is not limited to specific KB numbers (KB5066835, KB5074109, etc.).

Specific symptoms: After the update, you will encounter one of the following situations:

  1. Startup error (0x800705B4) Attempts to start a virtual machine from Hyper-V Manager fail after a timeout period."The application encountered an error while attempting to change the state of 'Virtual Machine Name'." "'Virtual Machine Name' could not be started." "'Virtual Machine Name' failed to initialize. The operation failed because a timeout period elapsed. (0x800705B4)"
  2. Loss of function The "Hyper-V" item itself disappears from the "Turn Windows features on or off" list, and it becomes impossible to even configure it.
Error code "0x800705B4"

This error code, 0x800705B4, generally indicates a timeout and suggests that a service or component required for Hyper-V startup is no longer responding properly due to an update.

0x800705B4: The update installation took too long or was interrupted

[IMPORTANT] Please do not re-run old activation batch files!

When you encounter this problem, many people may think, "Will it be fixed if I run the Hyper-V enable batch file again?" However,It is extremely dangerous to re-run the old-style activation batch files that are widely available on the Internet.

To avoid creating a more complicated situation by trying to solve one problem,Please do not re-execute the batch file carelessly.

Why are old batch files dangerous? The technical reasons

The root cause is an old batch file dir /b %SystemRoot%\servicing\Packages\*Hyper-V*.mum It's in the command:

Windows is%SystemRoot%\servicing\Packages The folder contains the update installation package.Not only the latest version of the package, but also older versions of packages that have been applied in the past remain.That's the point.

The old batch file runs the Hyper-V related packages in this folder as follows:Listing everything, new and oldThen, the following command will listForce all versions of a package to be added to the systemI will do it.

This results in an inconsistent system with both up-to-date and out-of-date packages.

When Windows Update detects this inconsistency, it determines that an update is necessary because there are old packages, and attempts to download and install the latest updates. However, because the batch file forcibly registers the old packages in the system, it is unable to correctly recognize that the update is complete. Therefore, every time you run Windows Update, it concludes that there are still old packages remaining, and the same update process is repeated endlessly.

This is the true nature of the Windows Update loop bug. To avoid this serious side effect, never run the old batch file.

If you find yourself in this situation again,System restoreThis can be solved by:

Solution: Updated batch fileRestore Hyper-V with

We have created an updated batch file that can flexibly accommodate not only the current "KB5074109" but also the previous "KB5066835" and specification changes due to future updates, and that will not cause Windows Update loop problems.

What is a batch file? How to create and run a batch file

[Why this batch file is safe]

The problem with the old batch file isPackagesLocated in a folderTargets all new and old Hyper-V related packagesIt was that.

The new batch file uses a smarter solution to this problem.

  1. First, use a PowerShell command to retrieve the exact "revision number" (detailed version information) of the current Windows installation from your system.
  2. Next, use the obtained revision number,dir /b %SystemRoot%\servicing\Packages\*Hyper-V*%REVISION%.mum With this command, you can select from the many packagesIt pinpoints only the latest and correct Hyper-V related packages, which have their revision number in the file name.

This prevents older versions of packages from being accidentally installed on your system, essentially avoiding the Windows Update loop bug.

Whether you are already experiencing issues or would like to enable Hyper-V, please use this batch file.

FirstextensionLet's display it.

[Execution procedure]

  1. Copy all of the code below.
  2. Open a text editor such as Notepad and paste the code you copied.
  3. Select "File" → "Save As".
  4. Change "File type" to "All files (*.*)" and change "File name" to a file ending with ", such as "Hyper-V_Enable_Fix.bat"..batSave it with the name ".
  5. Right-click the batch file you saved and click "Run as administrator."
  6. If "User Account Control" appears, click "Yes".
  7. A black command prompt screen will appear and the process will proceed automatically. When you see a message like "The operation completed successfully," press any key to close the window.
  8. Restart your PC.

▼ Latest Hyper-V enablement batch file

@echo off
pushd "%~dp0"

set "REVISION="

for /f %%i in ('powershell -Command "(Get-ItemProperty 'HKLM:\SOFTWARE\Microsoft\Windows NT\CurrentVersion').UBR"') do (
    set "REVISION=%%i"
)

if defined REVISION (
    echo Success: Revision number [%REVISION%].
    dir /b %SystemRoot%\servicing\Packages\*Hyper-V*%REVISION%.mum >hyper-v.txt
    for /f %%i in ('findstr /i . hyper-v.txt 2^>nul') do dism /online /norestart /add-package:"%SystemRoot%\servicing\Packages\%%i"
    del hyper-v.txt
    Dism /online /enable-feature /featurename:Microsoft-Hyper-V-All /LimitAccess /ALL
) else (
    echo Error: Failed to get revision number.
)

pause
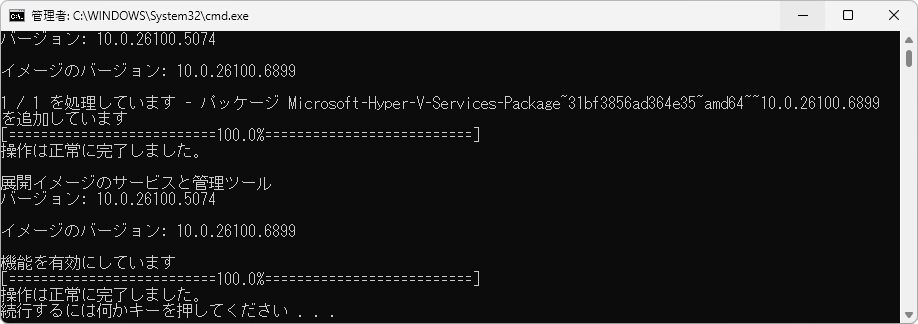
command prompt
command prompt

Post-execution confirmation

After restarting your PC, start Hyper-V Manager and try starting the virtual machine again. If the virtual machine starts normally without the error "0x800705B4", then the installation was successful.

If you can't find "Hyper-V Manager"

1. Press Windows Key + R to open Run, type the following command and press Enter:

%windir%\system32\control.exe /name Microsoft.AdministrativeTools

2. This will open "Control Panel\All Control Panel Items\Windows Tools".

3.You will find "Hyper-V Manager" in this list, so please launch it from here.

*You can also right-click the icon and pin it to the taskbar.

Control Panel\All Control Panel Items\Windows Tools

4. The Hyper-V Manager will start, but any virtual machines you created before the update may have been deleted.

In most cases, not all of the virtual machine's files have actually been deleted, but rather the virtual machine'sThe list was just deleted.

Hyper-V Manager
Hyper-V Manager

5. To restore the virtual machine you created, click "Import Virtual Machine" on the right.

Hyper-V Manager - Operations
Hyper-V Manager – Operations

6. "Before you begin" will be displayed, so simply click "Next".

Importing a Virtual Machine - Before You Begin
Importing a Virtual Machine – Before You Begin

7. "Search for Folder" will appear, so click "Browse".

Import Virtual Machine - Search Folder
Import Virtual Machine – Search Folder

8. The "Select Folder" screen will appear, so open the location containing the virtual machine folder called "Virtual Machines" and click "Select Folder".

*By default, it is located in the "C:\ProgramData\Microsoft\Windows\Hyper-V" folder.

フォルダーの選択
フォルダーの選択

9. You will be returned to "Search for Folders", so click "Next".

Import Virtual Machine - Search Folder
Import Virtual Machine – Search Folder

10. The "Select Virtual Machine" screen will appear. Select the virtual machine you want to import and click "Next."

Import Virtual Machine - Select Virtual Machine
Import Virtual Machine – Select Virtual Machine

11. The "Import Type" is displayed, so leave the default selection "Register the virtual machine in-place (use an existing unique ID)" and click "Next".

Import Virtual Machine - Import Type
Importing a Virtual Machine – Import Type

12. The "Completing the Import Wizard" screen will appear. Check the contents and click "Finish."

Importing a Virtual Machine - Completing the Import Wizard
Importing a Virtual Machine – Completing the Import Wizard

This will bring the virtual machine back up.

Hyper-V Manager - Virtual Machines
Hyper-V Manager – Virtual Machines

Summary

This time, we explained the cause of the Hyper-V startup error "0x800705B4" that occurs after applying updates in a Windows 11 Home environment, and a safe solution.

The important points are:Do not re-run old activation batch files carelesslyBy using the updated batch file provided in this article, you should be able to safely and permanently resolve the issue.

If this helped you or you have any questions, please let us know in the comments.

If you found this article helpful, please share it on social media.

Person who wrote this article

Driven by questions arising from my daily PC use and the desire to "do more," I have been pursuing self-study in Windows since around 2008. I am sharing the "aha!" techniques and solutions I discovered through trial and error with the sole purpose of helping you in your PC life.

View profile

Comment:

To comment

[About submissions]
We welcome any questions or information regarding the content of the article.
However, please note that content unrelated to the purpose of the article, criticism of specific individuals or organizations, offensive language,Inappropriate wordsComments containing the above may be deleted or made private without notice at the discretion of the administrator.
Please note that spam may be automatically deleted by anti-spam measures.

CAPTCHA


table of contents